


Secure Configuration of Enterprise Assets and Software
Introduction
Safeguard 4 - Secure Configuration of Enterprise Assets and Software
Procedures
4.1 - Establish and Maintain a Secure Configuration Process
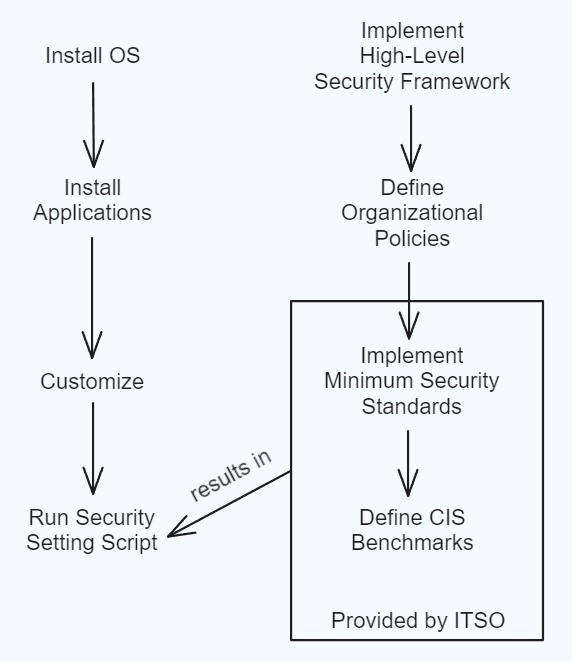
- Download the latest version of the desired operating system.
- Download the latest versions of the desired applications.
- Implement customizations (keyboard shortcuts, wallpapers, etc.)
- High level security framework (policy 7200 or NIST 800-171).
- Framework policies
- Minimum security standards built upon framework policies.
- CIS Benchmarks built upon minimum security standards.
- Security scripts combine the CIS benchmark scripts and local customization scripts to be run on your computer.
- Your computer now has an operating system that is compliant with VT’s security standards.
4.2 - Establish and Maintain a Secure Configuration Process for Network Infrastructure
- OS Install - ensure it is at least on vendor’s minimum stable version of recommended code
- Network management tool performs daily audits for compliance to standard configuration. Any deviations are corrected by the tool or engineering is alerted to the discrepancy.
- Network engineering reviews non-standard configuration requests.
- Network engineering applies non-standard configuration changes.
- Framework policies.
- Minimum security standards built upon framework policies.
- CIS Benchmarks built upon minimum security standards.
- Security scripts combine the CIS benchmark scripts and local customization scripts to be run on your computer.
- Your computer now has a network configuration that is compliant with VT’s security standards.
4.3 - Configure Automatic Session Locking on Enterprise Assets
Windows Computer
- Navigate to Settings > Accounts > Sign-in Options.
- Make sure Require Sign-in is set to a time under 15 minutes.
macOS Computer
- Navigate to Menu > System Preferences > Security and Privacy.
- Click Unlock to set preferences.
- Make sure the require password after __ checkbox is checked and the time is under 15 minutes.
- Click the lock to save your preferences.
Linux Computer
Debian
Follow Gnome Screen Lock Procedure.
Ubuntu
Follow Gnome Screen Lock Procedure.
Fedora
- Open
/etc/profile$ vim /etc/profile - Change TMOUT configuration to
readonly TMOUT=900 ; export TMOUT- In vim, press
i. - Navigate using arrow keys to the TMOUT section.
- Remove the current TMOUT contents and type
readonly TMOUT=900 ; export TMOUT. - Press
esc, type:wq, then press Enter.
- In vim, press
4.4 - Implement and Manage a Firewall on Servers
Windows Server
Windows Server Firewall can be accessed via the Windows Defender Firewall with Advanced Security application. To access this, follow these instructions:
- Open the search menu from the Windows start menu.
- Search for Windows Defender Firewall.
- Select Windows Defender Firewall.
From here you can enable and disable the Windows Defender Firewall for the Domain, Private and Public profiles. More information on how to utilize the Windows Defender Firewall can be found from the official Windows Documentation here.
macOS
Apple has discontinued macOS server. If you are looking for macOS client computer firewall instructions, see the endpoint firewall documentation.
Linux
This section lists firewall programs and apps that are recommended by or are the default of common server Linux distributions. Then, specific instructions for the more popular firewall applications are given.
Debian
All recent releases of Debian (after Debian 5.0 “lenny”) come with the iptables program installed by default, and configured to allow all traffic. It is expected that server administrators configure relevant rules to block unnecessary traffic.
However, iptables is being replaced by nftables by the same developers. Starting with Debian 10 “Buster”, the nftables framework is used by default. Debian installations still using the iptables backend are encouraged to migrate to nftables.
Server administrators are also encouraged to use a wrapper instead of handrolling iptables/nftables scripts. One such wrapper is firewalld, which integrates well with Debian installations. For a simpler interface to iptables, see Uncomplicated Firewall.
Source: Debian Firewall, Debian Nftables
Ubuntu
The default configuration tool for Ubuntu is ufw, which controls the iptables framework also available on Debian. It is initially disabled.
Source: Ubuntu Firewall
Fedora
Fedora comes with firewalld by default, which can be controlled by the firewall-cmd or firewall-config programs.
Source: Fedora Firewalld
Firewall Programs
Ufw Installation
Installation on Debian, Ubuntu:
  sudo apt-get update
  sudo apt-get install ufw
Installation on Fedora:
  sudo dnf update
  sudo dnf install ufw
Configuring Ufw for SSH
Important: If you are using an SSH connection to connect remotely, you need to allow incoming SSH connections. If this is not you, skip to number 3.
(Optional) Allow SSH connections:
Before enabling the UFW firewall first, you need to allow incoming SSH connections.
If you’re connecting to your server from a remote location, and you enable the UFW firewall before explicitly allow incoming SSH connections you will no longer be able to connect to your Debian server.
To configure your UFW firewall to accept SSH connections, run the following command:
sudo ufw allow OpenSSH
By default SSH uses port 22. If your configuration is using another port, use the command
sudo ufw allow <port>/tcp
where <port> is the port your configuration is using.
Enabling Ufw
Now that the UFW firewall is configured to allow incoming SSH connections, enable it by running:
sudo ufw enable
The output from the terminal will look like:
  Command may disrupt existing ssh connections. Proceed with operation (y|n)? y
  Firewall is active and enabled on system startup
You will be warned that enabling the firewall may disrupt existing ssh connections. Type “y” and press “Enter”.
Firewalld Installation
Installation on Debian, Ubuntu:
  sudo apt-get update
  sudo apt-get install firewalld
Installation on Fedora:
  sudo dnf update
  sudo dnf install firewalld
Firewalld Usage
Start firewalld, by entering the following commands:
  sudo systemctl unmask firewalld
  sudo systemctl start firewalld
(Recommended) To make firewalld start automatically at system start:
sudo systemctl enable firewalld
4.5 - Implement and Manage a Firewall on End-User Devices
Enabling Windows Defender Firewall
While many manufacturers of firewalls exist to choose from, Microsoft provides a firewall baked into Windows 10+ that is fairly robust and works quite well. Microsoft recommends the default settings be kept whenever possible when using their firewall.
- Go to Search and type in Control Panel.
- Select System and Security > Windows Defender Firewall.
- Choose Turn Windows Defender Firewall on or off.
- Select Turn on Windows Defender Firewall for domain, private, and public network settings.
- Enable Block all incoming connections, including those in the list of allowed apps for maximum security.
Enabling Mac Firewall
- On your Mac, choose Apple menu > System Preferences.
- Click Security & Privacy.
- Then click Firewall in the element selector along the top of the window.
- If the lock at the bottom left is locked, click it to unlock the preference pane.
- You may be prompted to enter your user’s password at this point; this is normal.
- Click Turn On Firewall. Once your screen shows Firewall: On, you are all set!
- Click Firewall Options and do the following:
- Allow only essential apps and services to connect: Select the Block all incoming connections checkbox
Linux
Debian
The Debian firewall is not installed by default. Similar to Ubuntu, Debian uses “Uncomplicated Firewall” (ufw) as its firewall.
To install ufw:
- Run these commands in Terminal
 sudo apt update
 sudo apt install ufw
Important: If you are using an SSH connection to connect remotely, you need to allow incoming SSH connections. If this is not you, skip to number 3.
- (Optional) Allow SSH connections:
- Before enabling the UFW firewall first, you need to allow incoming SSH connections.
- If you’re connecting to your server from a remote location, and you enable the UFW firewall before explicitly allow incoming SSH connections you will no longer be able to connect to your Debian server.
- To configure your UFW firewall to accept SSH connections, run the following command:
sudo ufw allow OpenSSH - By default SSH uses port 22. If your configuration is using another port, use the command
where <port> is the port your configuration is using.
sudo ufw allow <port>/tcp
- Now that the UFW firewall is configured to allow incoming SSH connections, enable it by running:
The output from the terminal will look like:
sudo ufw enableYou will be warned that enabling the firewall may disrupt existing ssh connections. Type “y” and press “Enter”.Command may disrupt existing ssh connections. Proceed with operation (y|n)? y Firewall is active and enabled on system startup
Ubuntu
Ubuntu’s “Uncomplicated Firewall” (ufw) is initially disabled. To enable it, go to the terminal prompt and enter:
sudo ufw enable
Fedora
The Fedora firewall is not installed by default.
firewalld is a firewall service daemon that provides a dynamic customizable host-based firewall with a D-Bus interface. Being dynamic, it enables creating, changing, and deleting the rules without the necessity to restart the firewall daemon each time the rules are changed.
- To install firewalld, run this command on the command line:
sudo dnf install firewalld - Start firewalld by entering the following commands:
sudo systemctl unmask firewalld sudo systemctl start firewalld - (Recommended) To make firewalld start automatically at system start:
sudo systemctl enable firewalld
4.6 - Securely Manage Enterprise Assets and Software
Securely manage and access university assets and software by using only approved university management solutions/tools and/or current industry standard management protocols (HTTPS, TLS v1.2 and greater). Do not use insecure protocols, such as Telnet, HTTP, SSL/TLS v1.0-1.1 unless operationally essential and with a documented exception and use of compensating controls. Remote access protocols such as SSH, RDP, and VNC should be used only with appropriate compensating controls (firewall restrictions, access controls, VPN, etc.)
4.7 - Manage Default Accounts on Enterprise Assets and Software
Make sure all accounts are password protected with something other than the default password. If accounts are not used, disable them.
Windows Computer
- Search Computer Management
- Navigate to Local Users and Groups > Users
- In the center panel, find DefaultAccount and right click. Select Properties
- Make sure the Account is Disabled box is checked
- Do this for all inactive accounts
macOS Computer
- Go to System Settings > Users and Groups > Advanced Settings
- Click the lock to make changes on your account
- Ensure the guest user and other non-essential users are turned off
- Click the lock to save your changes
Linux Computer
- Check to see what users are on your computer
cut -d: -f1 /etc/passwd - Change the password or delete an account (DO NOT delete an account that has a non-human like username, unless you are confident you know what you are doing)
  sudo passwd <username>
  sudo userdel <username>
4.8 - Uninstall or Disable Unnecessary Services on Enterprise Assets and Software
Quarterly, look through your installed applications and uninstall the ones that you no longer use.
4.9 - Configure Trusted DNS Servers on Enterprise Assets
This is already done for you
4.10 - Enforce Automatic Device Lockout on Portable End-User Devices
Windows Computer
- Search Group Policy Editor
- Navigate to Computer Configuration > Windows Settings > Security Settings > Account Policies > Account Lockout Policies
- Set Account lockout threshold to 20
macOS Computer
Open a terminal and run the command below
sudo /usr/bin/pwpolicy -n /Local/Default -setglobalpolicy 'maxFailedLoginAttempts=20'
Linux Computer
- Open
/etc/security/faillock.confvim /etc/security/faillock.conf - Change deny to any value less than 20
- In vim, press
i - Navigate using arrow keys to
deny = - Set deny to any value less than 20
- Press
esc, type:wq, then press Enter
- In vim, press
4.11 - Enforce Remote Wipe Capability on Portable End-User Devices
Follow the instructions in the Mobile Device Wiping knowledge base article to enforce remote wiping in Intune.
Other
If you have questions that are not covered in these procedures, please contact the VT IT Security Office itso@vt.edu for a consultation.